Monday, January 14, 2013

I HATE brown.

I hate hate hate BROWN. I know it's weird. I don't know why, but I just can't stand the color. I don't wear brown, EVER. I don't even own anything in this hideous shade. I hate tan, khaki and beige. I hate un-painted wood. Anything with the slightest hue of brown, I don't like it. If someone were to ask me if I liked something (be it clothes, shoes, paint or whatever) and it had brown in it, the answer would be no. Nomatter how rad it was.

So when we bought our home last September, imagine my disgust when almost every room was some shade of brown. It was everywhere. Entryways, hallways, bedrooms, livingrooms and in my glorious kitchen.  Well tonight I will sleep better knowing all that brown is finally GONE. Replaced by wonderful shades of gray, no pun intended; I am now a happy woman. Well, closer to being a happy woman.

You see, there is still one brown thing left. Our dreaded backsplash. Its brown ceramic tile with a variety of little brown inlayed glass mosaic.

Soon to be replaced by this FANTASTIC marble mosaic we found here. 
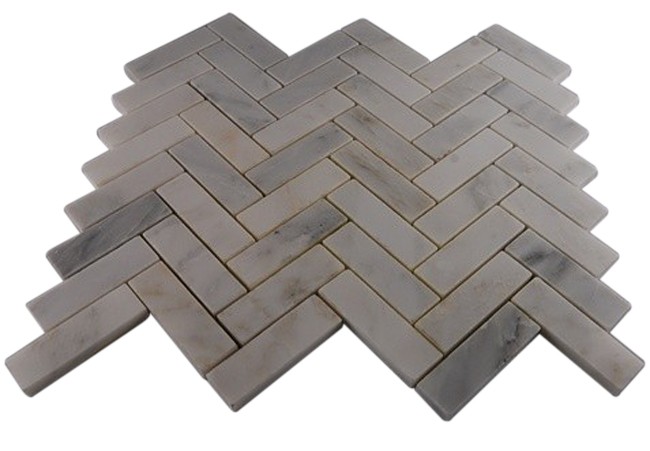
This marble mosaic is 500 times more beautiful in person.


Or at least that's what I am hoping. I left some pretty "subtle" hints this weekend while Mike's friend (who happens to do tile) was over.

I guess we will see what happens when my birthday rolls around next month....

Sunday, January 13, 2013

I really really really want a zig zag (wall) ahh.


So I've been wanting a zig zag wall in my kitchen for a LONG time.

 I painted the opposite wall the most wonderful shade of tangerine when we first moved in. THAT was easy.
This zig zag wall was another story. I knew I wanted big gray zig zags, but that was about it.

After staring at a white wall for  months, It's finally done.

This is how I did it.

1. I painted the wall white. All my paint was bought from Home Depot. After working there for 4 years, I'm still pretty loyal. The color I used was called Irish Mist.

2. I found the center of the wall.

3. Taking a 12 x 12 piece of scrapbook paper I had laying around, I started making a grid on the wall. To save time, I only marked the corners)


4. After I got the grid on the whole wall I started taping. This took the most time. first, I had to decide what order I wanted the colors to go. Since I ran out of white paint and didn't have enough for the very top of the wall, I "decided" to put the gray on top. I then took my tape and started making the zig zags. I did this by making diagonals through each square with the tape. Now this is where it gets a little tricky. I wanted my zig zags to be the same size. So I had to figure out what side of the grid + to put the tape.  I did lots of measuring and LOTS of double checking. The best advice I can give you is to start from the top. For the area that is to be painted, you want each point to hit the center of each + exactly.


This is what it looked like then it was all taped. It doesn't look even, but once I remove the tape it will all work out.

5. Before I started painting, I marked where the gray was going to go, just to be safe.


Its hard to see, but it says GRAY

6. Here is a little trick to make sure your lines are nice and crisp, with NO bleed marks. Take the color of the wall (in my case white) and paint a thin coat on the edges where the second color goes. This will seal the tape and make sure nothing bleeds through. This extra step made ALL the difference!


7. I waited 10 minutes for the white to dry, then painted my gray stripes. It took 2 coats.


8. remove the tape when the paint is still wet. SLOWLY.


9. TADA!


A new day...

Things change. This past year has been full of change. I battled PCOS, got engaged, bought my first home, moved to the middle of nowhere and left what I called home for the past 5 years. With all the excitement and   wonderful things happening, I was overcome with sadness and grief. I didn't want to leave my life.

It's been 5 months now. Most of my sadness is gone, and now I have a beautiful home to decorate. There is so much to be done, and being a perfectionist doesn't help.


Tuesday, February 7, 2012

What are YOUR dreams made of? Mine are made of size 4 pants.

While I talking with trainer J last night he asked me what my goals were. My goals, huh? Well, I want to weigh 110 and run marathons. And I want a crazy metabolism that lets me eat what ever I want. I want to wear skinny jeans and tall boots and look great doing it. scratch that. I want to FIND tall boots that fit my fat calves without searching online for a 'special size'. Apparently that is a lot to ask for.

In my search of boots that fit me, I came across three options.

1. Simplybe This is the place to go. They have every option for a voluptuous calf. Plus they have wide widths, too. DOUBLE WHAMMY.

2. Torrid Similar to simplybe with an edgier spin. Not as high quality, but neither is the price. Plus, I can shop this store locally.

3. Zappos Not as many options, medium high price tags. What I like is they show videos of actual women walking around in these boots. Plus, their customer service can't be beat. Literally. They are ranked #1.